 note, this is mostly a reminder for myself!
 The Sewing has always been for me a mystery.
When I turn the ancient sewing machine (that of my grandmother), my aunt gave me a crash course on how to thread the path through the labyrinth of holes, coils, reels , pivots etc. ...
This document is therefore a very detailed tutorial, which follows step not over ...
Follow me in this journey along the coil of wire!
First, we must put the coil. With the wire from behind. So we put the spool on the right peg.

Then we send the wire into the small hook at the top.

is lowered. We pass the thread in the bobbin case back through.

It comes with front and carries the line (from behind) in the hole of the tab that sticks out.

It gives this:

Here we go down the wire to pass into the small hook.
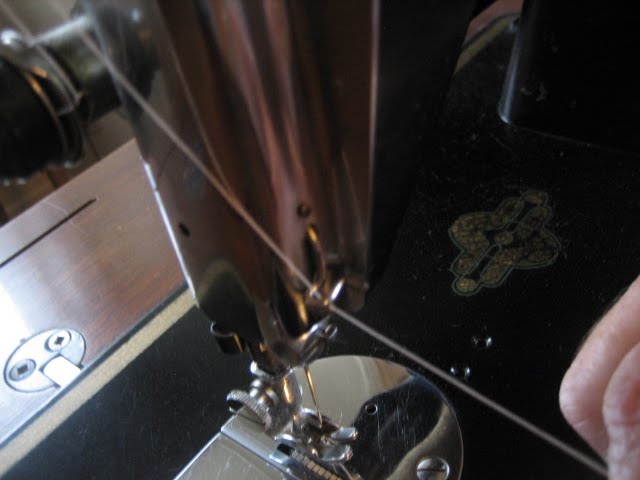
Then another small hook, just above the needle ...

Here at last, found the needle! There's a hole in the tip of the needle, where is my finger (careful on this photo, the wire is not passed in the second small hook, which is located just above the needle!) .

is threaded the needle, passing from right to left.

Finally, we slide the floss between your toes and it sends back.

OK! Phew! But beware, there is also a coil which is below. So the second step of installing the wire, which will be in a special coil.
The coil is as it should be that the wire is facing us.

We go back into the spool a reel holder, bringing out the thread through the small hole.

By dragging the wire, we arrive at it comes out there:

It opens the door of the small tab coil, to be able to easily write ...

can then insert in the housing of the magnetic coil, which is hidden below the sliding door just left of the needle.

It closes the sliding door, then took the first wire (the one we spent at the beginning), we take it from behind ...

There is rotated by hand the Ferris wheel to the right of the machine, which has the effect of raising and lowering the needle. In doing so, during his stay in the machine, while they do not look, over the top to the bottom of the wire enters the back ...

... and brought out through the small hole here. We can then catch him and send him back too.

Warning! We need to make a full turn to the needle if it makes a mess and he released 3 son instead of 1.
Now at the Helm by lever for raising or lowering the foot (which will bind or release the fabric they want to sew).

And this here is the thing that will determine the spacing between the stitches. To adjust, you must unscrew the screws on the left. Then you must put the leg towards the figure that I do not know what to give, but more the foot is stuck, the higher the point is tight. Then we will see that the screws can not descend lower than our fit. Is tightened up and voila.
So when the leg is fully up, it backed off (sometimes it is sewing backwards, apparently). So with a tighter fit, the path of the leg is shorter, so that the point will be as tight as before by from behind.

Yeah, well, let's say it's an option, it is not essential to begin ...
It is now ready to sew! All you need both our son from behind and drag our fabric under the foot! We lower the foot, with the handle mentioned earlier, then ...

It starts the engine, previously connected, pressing down his right knee on the leg that protrudes through the machine below. (Yes, my grandmother had bought a machine for ultra-modern era, it runs on electricity!)

note, the fabric will feed itself because it is placed on a something that makes him go (or backward when the control rod is at the top)!
But it's not all that! It spoke well of the small coil, but how can we meet? Here's the secret: There is a small
roulette next to the big wheel. This is done to put our small coil. It is therefore our
big coil is laying down on the pivot, we move the wire into the small thing here:

It gives it, all mounted:

can then coil the the big coil wire to the small coil by operating the motor of the machine!
For beginners like me, it is suggested to first try without putting yarn or fabric, just on paper! So I took a paper in my collection box and I did some tests! The trick is to try to make straight lines, forward, rewind and feather ...

can also try making curves, but this is more complex ...
The next step is to put the fabric and thread! Every single
finally!
TONTON ADDING THAT IS THAT TATA did not show me as it should:
(hihi art to sow discord in a couple!)
AlloAs designer in my spare time I would remark:I just watch your tutorial and I think there's a little freedom in how to move the wire to the 4th photo.When the wire from above through the rear of the tensor (the knurled nut is used to tension + or wire) between plates adjustable back forward and upward (here the error I think) must pass through the hook and then in the spring and from there to the swing arm which pulls the wire.This hook (left on picture) allowing the thread to do more than a half turn between plates adjustable.For cons, I do not know if my way works better results.Bye
And again:
Towards the end of your presentation, you explain the fab. the small coil. When you use the engine for this winding, by unscrewing the knurled chrome wheels at the right end (center of the big wheel) of the machine, prevents you from moving the needle.Reby
To which I answered that I did not have my glasses rectory ...
His answer was quick:
AlloAs designer in my spare time I would remark:I just watch your tutorial and I think there is little freedom in how to move the wire to the 4th photo.When the wire from above through the rear of the tensor (the knurled nut is used to tension + or wire) between plates adjustable back forward and upward (here the error I think) must pass through the hook and then in the spring and from there to the swing arm which pulls the wire.This hook (forgotten in photo) allows the wire to make more than a half turn between plates adjustable.For cons, I do not know if my way works better results.Bye
Towards the end of your presentation, you explain the fab. the small coil. When you use the engine for this winding, by unscrewing the knurled chrome wheels at the right end (center of the big wheel) of the machine, prevents you from moving the needle.Reby
For the first speech, I understood nothing!
Regarding the second, ahem, very clever!
Thanks Uncle!
Added following comment amg:

In the 4th photo, what is wrong is that instead of leaving the green arrow, the wire should exit at the pink arrow. The rest is good.
Thanks, amg!
0 comments:
Post a Comment